The Ultimate Guide to Installing Vinyl Plank Flooring
Upgrading the floors in your home can feel daunting, but luxury vinyl plank flooring offers a perfect balance of style, durability, and DIY accessibility. Unlike traditional hardwood or tile, which often require professional machinery and messy adhesives, vinyl planks are designed for the average homeowner to install over a single weekend. This material effectively mimics the appearance of natural wood while providing a waterproof surface that is much softer underfoot. When you consider the long-term value of your home, routine care for your property ensures these aesthetic upgrades last for decades. Taking the time to understand the nuances of a floating floor system will save you both time and money during the renovation process.
The project itself typically falls into the intermediate complexity category and can be completed in about one to two days, depending on the size of the room. Luxury vinyl is significantly thicker than standard sheet vinyl, which contributes to its durability and ease of handling. Because it is a floating floor, it does not need to be glued or nailed to the subfloor. Instead, the planks lock together and sit on top of the existing surface, held down by their own weight and the baseboards at the perimeter. This makes it an ideal choice for basements, kitchens, and bathrooms where moisture might otherwise damage natural materials.
Before you begin the physical labor, you must focus on the planning and acclimation phase to ensure the material performs as expected. You should start by calculating the total square footage of your space and adding at least ten percent for waste; if you are attempting a complex pattern, that margin should increase to twenty percent. Once the materials arrive, they must sit in the room where they will be installed for at least forty eight hours to adjust to the temperature and humidity. Many homeowners find that visiting http://premierhardwood.net provides additional inspiration for choosing the right plank textures and styles before they commit to a specific layout. Proper preparation at this stage prevents the planks from buckling or shrinking after the installation is complete.
Preparation is the Foundation of Success
The quality of your finished floor is almost entirely dependent on the work you do before the first plank is ever laid down. You must begin by stripping away any old carpeting or padding until you reach the solid subfloor. While vinyl can often be installed over existing tile or laminate, the surface must be perfectly level and free of any structural damage. Any protruding nails or screws should be driven flush, and the entire area must be vacuumed until no debris remains, as even a small pebble can create a noticeable bump under the flexible vinyl.
Getting the Math Right Before the First Cut
One of the most common mistakes in flooring is starting with a full plank and ending up with a tiny, unstable sliver at the opposite wall. To avoid this, measure the width of the room and subtract the necessary expansion gaps at both ends. Divide this total width by the width of a single plank to see how many rows you will need. If the final row is going to be less than half the width of a full plank, you should “rip” or cut your first row to a narrower size. By splitting the difference between the first and last rows, you create a balanced, professional look that is visually pleasing to the eye.
Laying the Groundwork with Underlayment
Even though many modern planks come with a pre-attached pad, adding a separate underlayment is often a wise choice, particularly when working over concrete. This layer acts as a moisture barrier and provides extra sound dampening for the room. You should roll the underlayment out in a direction perpendicular to how you plan to lay the planks. Be careful to tape the seams together without overlapping the edges, as an overlap would create a ridge that prevents the planks from locking together smoothly.
See also: What Are The Benefits Of Working With Custom Home Builders
The Art of the Perfect Layout
Starting the actual installation requires a keen eye for detail and a steady hand as you establish the first few rows. You should always work from a corner, placing spacers against the wall to maintain a quarter-inch expansion gap. This gap is vital because floors naturally expand and contract with the changing seasons. Without it, your floor could buckle or pull apart at the seams.
When you begin laying the planks, ensure the groove edge is facing away from the starting wall. It is also important to open several boxes of flooring at once and mix the planks. This technique prevents “blotching,” where one area of the floor looks slightly different in shade than another due to minor variations in manufacturing batches. By staggering the seams of the planks by at least eight inches, you provide the floor with the structural integrity it needs to remain flat and locked under heavy foot traffic.
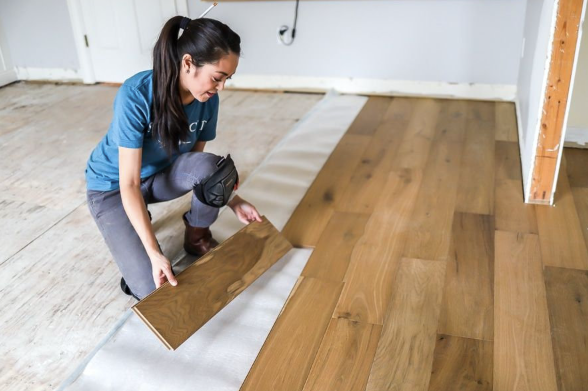
To connect the planks, you will use a tongue-and-groove system that clicks into place. A tapping block and a rubber mallet are your best friends during this stage, allowing you to gently nudge the planks together without damaging the delicate locking edges. As you reach the end of each row, you will likely need to trim a plank to fit. You can do this easily by flipping the plank over, marking the cut line with a speed square, and scoring it with a sharp utility knife. Once scored, the plank should snap cleanly along the line, giving you a perfect fit against the wall spacer.
Navigating Obstacles and Finishing the Look
Rarely is a room a perfect rectangle, and you will eventually encounter door jambs and transitions that require a more surgical approach. Instead of trying to cut the flooring to fit around a complex door frame, it is much easier to cut the frame to fit the flooring. Using an oscillating multitool, you can undercut the bottom of the door casing so the vinyl plank slides right underneath it. This results in a much cleaner look than trying to fill gaps with caulk or putty later.
Transition strips are another essential component for a high-quality finish, especially where the new vinyl meets a different flooring type like carpet or tile. You should leave a small gap between the vinyl and the transition rail to allow for movement. Most manufacturers offer color-matched strips that provide a seamless flow from room to room. Once the transitions are in place, the very last step is to install shoe molding or baseboards. These should be nailed directly into the wall, never into the floor itself. By pinning the molding to the wall, you allow the floor to “float” freely underneath, ensuring that your hard work remains beautiful and functional for years to come.