How to Install Front Door Hardware
The entrance to your home acts as a primary focal point, serving as the literal and metaphorical handshake you extend to every guest who arrives at your doorstep. Over time, however, the once-bright finish of your handle might begin to tarnish, or the mechanical components of your deadbolt may start to feel sluggish and unreliable. Replacing this hardware is one of the most cost-effective and high-impact DIY projects a homeowner can undertake, offering an immediate boost to both security and aesthetic charm. Before you dive into the mechanical details of the installation, it is helpful to visualize how a fresh set of hardware coordinates with other entryway upgrades; for instance, many homeowners find it beneficial to visit phantom screens long island to explore how integrated screening solutions can complement a newly refreshed door. By focusing on these small details, you can transform a standard entry into a sophisticated statement piece.
Upgrading your door hardware is about more than just a shiny new look; it is a vital step in maintaining the structural integrity and safety of your residence. Modern hardware kits are designed with improved internal mechanisms that offer smoother operation and greater resistance to tampering than the models of a decade ago. When you choose to replace an aging lock, you are making a conscious decision to fortify your home’s primary defense against the elements and unwanted visitors alike. This project requires only a few basic tools and a bit of patience, making it an ideal weekend task for anyone looking to improve their home’s functionality without a massive financial investment.
When planning a full entryway overhaul, it is common to look at the surrounding architecture to see what else could benefit from a professional touch. While hardware is a simple task for any enthusiast, larger structural changes might lead you to seek out a northeast home service to ensure that your remodeling goals are met with expert precision and care. Whether you are aiming for a modern, sleek look or a more traditional, ornate aesthetic, the hardware you choose will be the finishing touch that ties the entire design together. Taking the time to understand the installation process ensures that your new investment will function perfectly for years to come.
Gathering Your Essential Toolkit
Starting any home improvement project on the right foot requires having all your necessary instruments laid out and ready for use.
While most modern door hardware kits are designed for universal application, you will still need a few standard household tools to complete the job efficiently. A reliable manual screwdriver, specifically a cross-head or Phillips version, is the most important tool in your arsenal, as it allows for the tactile precision needed to avoid over-tightening. You will also want a tape measure on hand to verify your door’s dimensions and a power drill in case your new handleset requires a secondary mounting hole that wasn’t present on your previous setup. Finally, having a small container of wood putty can be helpful if you need to fill in old screw holes that won’t be covered by the new hardware.
Clearing the Way: Removing the Old Components
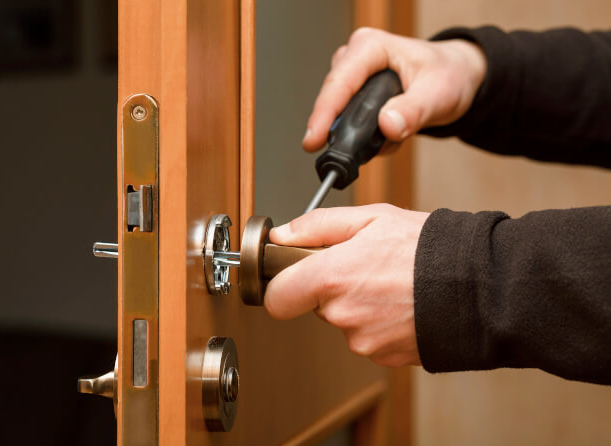
The first physical step in your journey involves the careful disassembly of the existing lockset and handle.
Begin by opening the door, so you have access to both sides of the hardware simultaneously. Locate the mounting screws on the interior side of the door; these are usually visible on the rose or the backing plate of the handle. Use your screwdriver to remove these screws, which will release the tension holding the interior and exterior halves of the handle together. Once the screws are out, the handles should slide away from the door with minimal effort. Repeat this process for the deadbolt, taking care to catch the heavy cylinder as it slides out of the exterior side so it doesn’t fall and damage your flooring.
Next, focus your attention on the edge of the door where the latch and bolt are housed. Unscrew the small plates that hold these mechanisms in place and gently pry them out of their recesses. Finally, remove the strike plates from the door frame. These are the metal plates that the latch and bolt click into when the door is closed. It is often a good idea to keep these old parts in a small box until the new installation is complete, just in case you need to reference a specific measurement or screw type during the process.
The Power of Precision: Measuring for a Perfect Fit
Measurement is perhaps the most critical phase of the installation, as even a small discrepancy can lead to a lock that sticks or a handle that sits crooked.
The most important measurement you will take is the backset, which is the distance from the leading edge of the door to the center of the large hole bored through the door’s face. In most residential settings, this distance is either 2 3/8 inches or 2 3/4 inches. Most contemporary hardware kits feature an adjustable latch that can accommodate either size with a simple twist or slide of the mechanism, but knowing your measurement beforehand will save you a great deal of frustration during the assembly phase.
Additionally, you should check the thickness of your door. While most standard entry doors are 1 3/4 inches thick, some older or custom-built doors may vary. Ensure that the hardware kit you have purchased is rated for your specific door thickness, as kits for thinner doors will have mounting screws that are too short to reach the exterior components. If you are installing a full-length handleset, you will also need to measure the distance between the main handle hole and the bottom mounting hole to ensure that the new handle will cover the existing footprint on the door’s surface.
Laying the Foundation: Installing the New Latches
With the door prepped and measured, you can begin the rewarding process of putting the new components into place.
Slide the new deadbolt latch and the handle latch into the holes on the edge of the door. It is vital to pay close attention to the orientation of the handle latch; the beveled or slanted side must face toward the door frame so that it can retract smoothly when it hits the strike plate as the door closes. If you install it backward, the door will not stay shut without manually turning the handle. Secure these latches with the provided wood screws, ensuring they sit flush within the recessed “mortise” on the door edge so they don’t catch or rub against the frame.
Once the latches are in, move to the door frame to install the new strike plates. These are the components that ensure the door stays securely locked and aligned. Align the new plates with the existing holes in the frame and screw them in tightly. If the new plates are a different shape from the old ones, you might need to use a small chisel to slightly enlarge the recess in the wood, though most standard kits use universal sizing to avoid this extra step.
Securing the Entry: Installing the Deadbolt
The deadbolt is the heart of your home’s security, and its installation requires careful alignment of the internal gears.
Begin by sliding the exterior cylinder through the latch mechanism you just installed. Inside the latch, there is a square or rectangular opening that the deadbolt’s “tailpiece” (the flat metal bar) must pass through. Once the exterior half is in place, move to the inside of the door and align the thumb-turn piece with that same tailpiece. This can sometimes be a bit of a balancing act, as the exterior piece may want to slide out while you are trying to line up the interior side.
Once both halves are aligned, insert the long mounting screws through the interior plate and into the threaded housing of the exterior cylinder. Tighten these by hand first to ensure the threads are properly engaged, then use your screwdriver to snug them up. Before moving on, test the lock with both the interior thumb-turn and the exterior key. The bolt should slide in and out of the latch with zero resistance; if you feel it binding, you may need to loosen the screws slightly and realign the plates before retightening.
See also: What Are the Best Lobster Recipes to Try at Home?
The Final Touch: Mounting the Handleset and Lever
The final phase of the project is installing the main handleset, which provides the primary grip for opening and closing the door.
Insert the exterior handle through the latch, ensuring the spindle passes through the center of the mechanism. On the interior side, slide the lever or knob onto the spindle. If your handleset features a long decorative plate that extends down the door, there will be a mounting screw at the very bottom. If your door does not already have a hole for this screw, you will need to mark the spot, remove the handle, and drill a small hole all the way through the door.
Once all components are aligned, secure the interior lever to the exterior handle using the provided screws. For the bottom mounting screw, you will usually find a decorative cap or washer that covers the screw head on the interior side, providing a clean, finished look. Take a moment to step back and ensure the handle is perfectly vertical before you perform the final tightening of all the screws.
Testing Your Handiwork for Longevity
After the hardware is fully installed, the last step is a thorough functional check to ensure everything is operating as intended.
Open and close the door several times to check that the latch engages the strike plate correctly and that the door stays shut without rattling. Test the deadbolt several times while the door is closed; if the bolt hits the back of the hole in the frame or rubs against the strike plate, you may need to deepen the hole in the wood or shift the strike plate slightly. A well-installed lock should operate smoothly with a satisfying “click,” requiring no extra force to turn the key. By following these steps and taking your time with the measurements, you have successfully updated your home’s entrance, providing a fresh new look and renewed peace of mind for everyone inside.